!!!!!ONLY WORKS WITH DS/DSLITE AND MODDED DSI/3DS!!!!!
!!!!!WILL CRASH ON UNMODDED 3DS/DSI!!!!!
I never liked the fact that my R4 has some random game's icon. I've been searching for a way to change it, but all I could find was posts from the past 15 years asking the same thing, only to be told it's impossible.
I'm here to change that.
You need:
-an R4 card (obviously)
-a homebrewed 3DS (or 2DS, 3DS XL, New 3DS, New 3DS XL, New 2DS XL, Newer 4DS XXL, etc)
-NTRboot Flasher
-a PC/Laptop (All the programs here are on Windows, some also have a Mac or Linux version, but I don't guarantee that those that don't will work with Wine.)
-a DS or DS Lite (if you use an R4 with a DSi or a 3DS, what's wrong with you? Just use TWLmenu like a normal person.)
-a Hex editor (I use HxD)
-NSMBEditor (from New Super Mario Bros. Hacking Domain)
-Aseprite
-A way to transfer data between your PC and 2/3DS (SD card adapter or FTPD)
-GameHeader (from Romhacking dot net)
-A ROM of the game from your R4's icon (mine is the Korean version of Bomberman Land Touch!) (I'm not telling you where to get it. I mean, I wish I could, but the rules don't allow me to.)
-DeSmuME
-A dump of the DS BIOS
First things first, BACK UP YOUR CARD.
Open NTRboot Flasher (Shut down your 3DS, hold Start while turning it back on, select NTRboot Flasher then press A to continue).

Write down (or just remember) the site written on your card's sticker.
Insert the card into the console.
(WATCH OUT) Select your card from the list (Don't look at the name on the list. Look at the site on the bottom screen. Mine is an R4 SDHC Dual-Core but I have to select "R4iSDHC Family" because it has "r4isdhc.com" written on it)

Select "Dump Flash" (This will make a backup of it)
The file's kernel will be exported to ntrboot/*whatever*-backup.bin on the root of your 3DS' SD card. (*whatever* will be your card's name)
Wait 'till it's done and you'll see "Dump Complete!" in green text. Press B to return to the main menu, then "Poweroff".
Now, you can either take the SD card out of your 3DS and put it into your computer, or turn on your console, open FTPD and transfer the file there.

That's the file you need.
STORE IT SAFELY 'CAUSE YOU'RE FUCKED IF ANYTHING GOES WRONG!
Next, find the ROM of the game the icon is from. (IT HAS TO BE THE EXACT REGION AND VERSION AS THE LOGO)
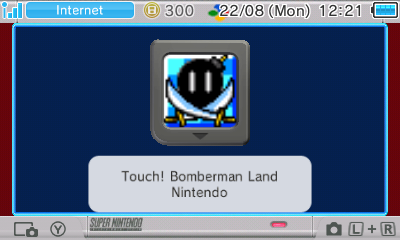

Back this up as well.
Now, make a copy of both the rom and the NTRboot backup.

Now, the fun part begins.
Get whatever image you want to make your icon.
Because I'm the least serious person on the planet, I decided to use this picture for the tutorial:

Next, open Aseprite. Your picture should be in your clipboard.
Click "New File", then click OK. An empty page should open with the resolution of your image. All you need to do now is press CTRL+V to paste it, then click outside the image to paste it.
Next, press C and make the image square. In my case, the width is 600 and height is 611
so I set both to 600.
Next, if you want, press C again and set it to something like 480x480 to zoom in because the finished image will be very low res and you have basically no space to waste.

Next, go to Sprite > Sprite Size, and the resizing window will appear.
Set the percentage to 50% in both cases, and the interpolation method to Nearest Neighbor, then press OK.
Repeat a few times until the image is at around 60x60.
Now set the Interpolation to Bilinear and the Width and Height to 32 pixels, press OK.
If the image looks messy, then press CTRL+Z to undo the action and go back to the point where it was at 120x120. Now set the width and height to 32x32 again, and press OK.
Now you have a Minecraft painti- uhh i mean icon.
Go to File > Export and press the (...) next to Output File. There you can set a filename and location. Set "Resize" to 100% then press Export.
You can close Aseprite now.
Open NSMBEditor and select the copy rom.
Double-click "banner.bin". A sprite editor will open but you will notice all there is there is a pink square.

Tick the "View in 4pbb format" checkbox and the ROM's icon should appear.
Now, select "import this bitmap and recreate palette", then select your image.
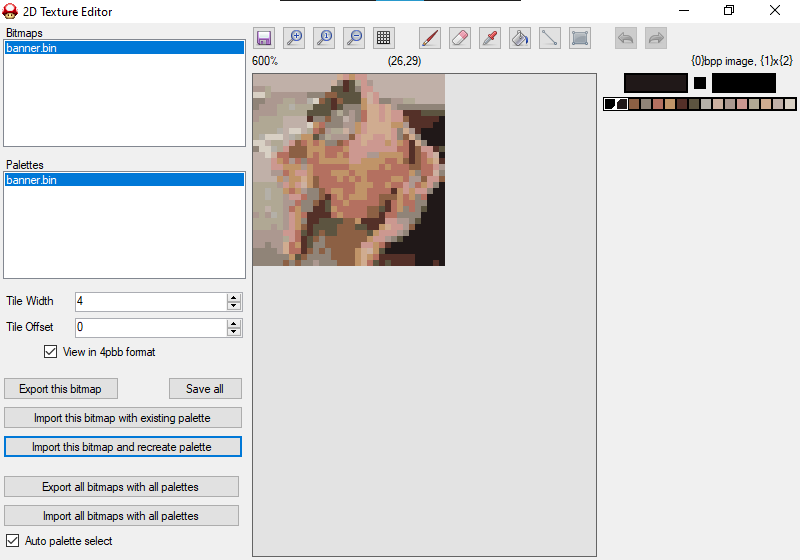
Save the file then close NSMBedit.
So far, you changed the icon in a rom.
Open DeSmuME and go to Config > Emulation Settings. Enable "Use external BIOS images", "Use external firmware image" and "Boot from firmware (like the NDS)". Configure the BIOS' and firmware's location (bios9, bios7, firmware).bin
Now, open the ROM. The Nintendo DS main menu will open, showing your icon.

This is great, but the title is the same.
This is where the Hex editor comes into play.
Open the ROM in a hex converter, then open a text to hex converter.
The title is stored as normal letters, but they're separated with a 00.
So, I'm looking for B o m b e r m a n.
"Bomberman" is 42 6F 6D 62 65 72 6D 61 6E, so I'm looking for 42 00 6F 00 6D 00 62 00 65 00 72 00 6D 00 61 00 6E.
Here we have it.

Now, a bit of bit info.

The icon header (?) starts after those Y's. The first two rows are important, remember them. The third and fourth characters are important (the ones highlighted in the image). They are the expected CRC16 test value that the DS expects from the icon and name. Basically, the DS runs an algorithm to see if anyone's tampered with the ROM. (which is exactly what we're doing, so we need to bypass that).
Let's go back to the l a b e l. You can do whatever you want with it (you have so much space that if you fill it it'll go off screen. I mean, you're not gonna write the Bee Movie script aren't you?) as long as every character is separated by a 00 and the top and bottom lines are separated by a 0A.
You need to write the title like this:

You need to replace it 6 times: for Japanese, English, French, Italian, German, Spanish.
If you don't care about leaving the other languages like before, then just change the second entry.
Save the file, and let's see in DeSmuME.

What's this? They're gone?
Yeah. The checksum I mentioned earlier failed.
Don't worry though, as you can see the (virtual) console detects the game, but can't verify the title.
This is where YET ANOTHER PROGRAM comes into play.
GameHeader.
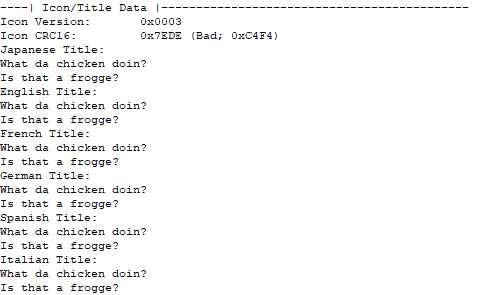
As I said, the CRC16 failed. The expected response is stored semi-backwards, so where the Program says 0x7EDE it's stored as DE7E. The output is 0xC4F4 so we need to replace DE7E with F4C4.
Save and…
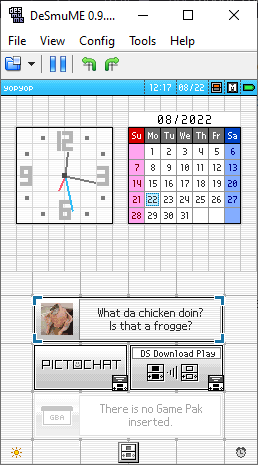
We're done! We made a header!
But we're not actually done.
We need to add this to the flashcart.
Look for the icon header thingy in the NTRboot file like we did for the rom.
Now replace the icon. (copy-paste)
Replace the title as well, and you're basically done!
It should look identical to the ROM.
Copy the file to the NTRboot/ folder on your 3DS' SD card, replace the original backup with it, then open NTRboot Flasher. Select your card. Select "Restore" and wait until it's finished.
If you did this correctly, then the "Writing sectors" part should be done almost instantly. Now pop the R4 card in your DS and you can see it's done.
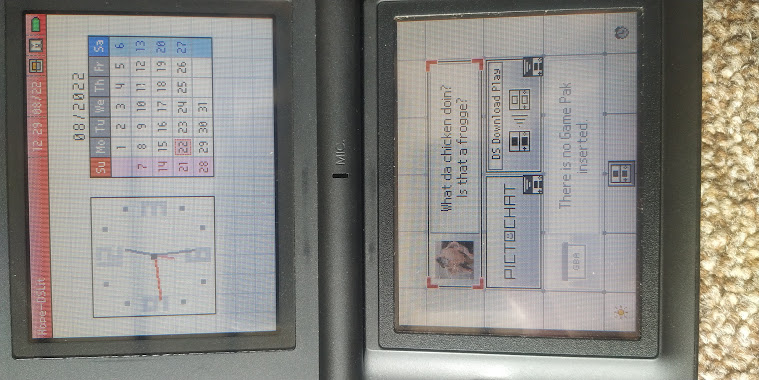
If you put it in your 3DS, you'll notice it didn't work and it's the same as before. Well, not really. If you open the "Titles" section in FBI it'll have the correct name and icon.
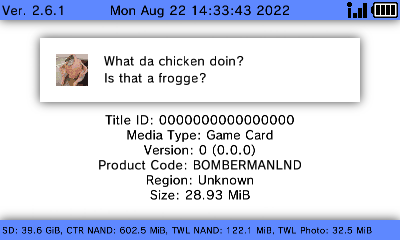
The home menu remembers the icon, so it doesn't read it again, so it has no idea we changed it. But the cart is changed. So the cart's icon change only affects the DS and the DS Lite. (I don't have a DSi, can anyone with one try this and check if it works there?)
So yeah, that's the tutorial, and now you can ignore all the posts from the past 15 years saying that it's impossible. Because it's not. I have no idea what I'm doing and I have zero experience doing this kinda stuff, and I somehow did "the impossible". The only reason it was impossible is because nobody tried it.
P.S. i just realized that's a fish not a frog
UPDATE: HOW TO FIX THE ICON AND TITLE FOR THE DSI AND 3DS
The title is stored 8 times after the icon. Highlight starting from the icon, ending on the last row before the 7th title.
View attachment 323771
View attachment 323773Be sure to select from the left side.
Copy all that.
Then go to https://crccalc.com and paste it there,
Set Input and Output to HEX and select CRC-16.
View attachment 323774
Find the one in the MODBUS row.
View attachment 323775
It's 8A5B so I have to type it semi-backwards (5B8A).

Now select from before the 8th entry, paste and then enter in the NEXT TWO slots.

And now from after the 8th entry, before the 10 billion FF FF FF FF FF FF (YY YY YY YY) rows.

And then paste it again, in the NEXT TWO.

Now flash the NTRboot backup.
And yes, I changed my icon before I edited the guide to add the last part.

!!!!!WILL CRASH ON UNMODDED 3DS/DSI!!!!!
I never liked the fact that my R4 has some random game's icon. I've been searching for a way to change it, but all I could find was posts from the past 15 years asking the same thing, only to be told it's impossible.
I'm here to change that.
You need:
-an R4 card (obviously)
-a homebrewed 3DS (or 2DS, 3DS XL, New 3DS, New 3DS XL, New 2DS XL, Newer 4DS XXL, etc)
-NTRboot Flasher
-a PC/Laptop (All the programs here are on Windows, some also have a Mac or Linux version, but I don't guarantee that those that don't will work with Wine.)
-a DS or DS Lite (if you use an R4 with a DSi or a 3DS, what's wrong with you? Just use TWLmenu like a normal person.)
-a Hex editor (I use HxD)
-NSMBEditor (from New Super Mario Bros. Hacking Domain)
-Aseprite
-A way to transfer data between your PC and 2/3DS (SD card adapter or FTPD)
-GameHeader (from Romhacking dot net)
-A ROM of the game from your R4's icon (mine is the Korean version of Bomberman Land Touch!) (I'm not telling you where to get it. I mean, I wish I could, but the rules don't allow me to.)
-DeSmuME
-A dump of the DS BIOS
First things first, BACK UP YOUR CARD.
Open NTRboot Flasher (Shut down your 3DS, hold Start while turning it back on, select NTRboot Flasher then press A to continue).
Write down (or just remember) the site written on your card's sticker.
Insert the card into the console.
(WATCH OUT) Select your card from the list (Don't look at the name on the list. Look at the site on the bottom screen. Mine is an R4 SDHC Dual-Core but I have to select "R4iSDHC Family" because it has "r4isdhc.com" written on it)
Select "Dump Flash" (This will make a backup of it)
The file's kernel will be exported to ntrboot/*whatever*-backup.bin on the root of your 3DS' SD card. (*whatever* will be your card's name)
Wait 'till it's done and you'll see "Dump Complete!" in green text. Press B to return to the main menu, then "Poweroff".
Now, you can either take the SD card out of your 3DS and put it into your computer, or turn on your console, open FTPD and transfer the file there.
That's the file you need.
STORE IT SAFELY 'CAUSE YOU'RE FUCKED IF ANYTHING GOES WRONG!
Next, find the ROM of the game the icon is from. (IT HAS TO BE THE EXACT REGION AND VERSION AS THE LOGO)
Back this up as well.
Now, make a copy of both the rom and the NTRboot backup.
Now, the fun part begins.
Get whatever image you want to make your icon.
Because I'm the least serious person on the planet, I decided to use this picture for the tutorial:
Next, open Aseprite. Your picture should be in your clipboard.
Click "New File", then click OK. An empty page should open with the resolution of your image. All you need to do now is press CTRL+V to paste it, then click outside the image to paste it.
Next, press C and make the image square. In my case, the width is 600 and height is 611
so I set both to 600.
Next, if you want, press C again and set it to something like 480x480 to zoom in because the finished image will be very low res and you have basically no space to waste.
Next, go to Sprite > Sprite Size, and the resizing window will appear.
Set the percentage to 50% in both cases, and the interpolation method to Nearest Neighbor, then press OK.
Repeat a few times until the image is at around 60x60.
Now set the Interpolation to Bilinear and the Width and Height to 32 pixels, press OK.
If the image looks messy, then press CTRL+Z to undo the action and go back to the point where it was at 120x120. Now set the width and height to 32x32 again, and press OK.
Now you have a Minecraft painti- uhh i mean icon.
Go to File > Export and press the (...) next to Output File. There you can set a filename and location. Set "Resize" to 100% then press Export.
You can close Aseprite now.
Open NSMBEditor and select the copy rom.
Double-click "banner.bin". A sprite editor will open but you will notice all there is there is a pink square.
Tick the "View in 4pbb format" checkbox and the ROM's icon should appear.
Now, select "import this bitmap and recreate palette", then select your image.
Save the file then close NSMBedit.
So far, you changed the icon in a rom.
Open DeSmuME and go to Config > Emulation Settings. Enable "Use external BIOS images", "Use external firmware image" and "Boot from firmware (like the NDS)". Configure the BIOS' and firmware's location (bios9, bios7, firmware).bin
Now, open the ROM. The Nintendo DS main menu will open, showing your icon.
This is great, but the title is the same.
This is where the Hex editor comes into play.
Open the ROM in a hex converter, then open a text to hex converter.
The title is stored as normal letters, but they're separated with a 00.
So, I'm looking for B o m b e r m a n.
"Bomberman" is 42 6F 6D 62 65 72 6D 61 6E, so I'm looking for 42 00 6F 00 6D 00 62 00 65 00 72 00 6D 00 61 00 6E.
Here we have it.
Now, a bit of bit info.
The icon header (?) starts after those Y's. The first two rows are important, remember them. The third and fourth characters are important (the ones highlighted in the image). They are the expected CRC16 test value that the DS expects from the icon and name. Basically, the DS runs an algorithm to see if anyone's tampered with the ROM. (which is exactly what we're doing, so we need to bypass that).
Let's go back to the l a b e l. You can do whatever you want with it (you have so much space that if you fill it it'll go off screen. I mean, you're not gonna write the Bee Movie script aren't you?) as long as every character is separated by a 00 and the top and bottom lines are separated by a 0A.
You need to write the title like this:
You need to replace it 6 times: for Japanese, English, French, Italian, German, Spanish.
If you don't care about leaving the other languages like before, then just change the second entry.
Save the file, and let's see in DeSmuME.
What's this? They're gone?
Yeah. The checksum I mentioned earlier failed.
Don't worry though, as you can see the (virtual) console detects the game, but can't verify the title.
This is where YET ANOTHER PROGRAM comes into play.
GameHeader.
As I said, the CRC16 failed. The expected response is stored semi-backwards, so where the Program says 0x7EDE it's stored as DE7E. The output is 0xC4F4 so we need to replace DE7E with F4C4.
Save and…
We're done! We made a header!
But we're not actually done.
We need to add this to the flashcart.
Look for the icon header thingy in the NTRboot file like we did for the rom.
Now replace the icon. (copy-paste)
Replace the title as well, and you're basically done!
It should look identical to the ROM.
Copy the file to the NTRboot/ folder on your 3DS' SD card, replace the original backup with it, then open NTRboot Flasher. Select your card. Select "Restore" and wait until it's finished.
If you did this correctly, then the "Writing sectors" part should be done almost instantly. Now pop the R4 card in your DS and you can see it's done.
If you put it in your 3DS, you'll notice it didn't work and it's the same as before. Well, not really. If you open the "Titles" section in FBI it'll have the correct name and icon.
The home menu remembers the icon, so it doesn't read it again, so it has no idea we changed it. But the cart is changed. So the cart's icon change only affects the DS and the DS Lite. (I don't have a DSi, can anyone with one try this and check if it works there?)
So yeah, that's the tutorial, and now you can ignore all the posts from the past 15 years saying that it's impossible. Because it's not. I have no idea what I'm doing and I have zero experience doing this kinda stuff, and I somehow did "the impossible". The only reason it was impossible is because nobody tried it.
P.S. i just realized that's a fish not a frog
UPDATE: HOW TO FIX THE ICON AND TITLE FOR THE DSI AND 3DS
The title is stored 8 times after the icon. Highlight starting from the icon, ending on the last row before the 7th title.
View attachment 323771
View attachment 323773Be sure to select from the left side.
Copy all that.
Then go to https://crccalc.com and paste it there,
Set Input and Output to HEX and select CRC-16.
View attachment 323774
Find the one in the MODBUS row.
View attachment 323775
It's 8A5B so I have to type it semi-backwards (5B8A).
Now select from before the 8th entry, paste and then enter in the NEXT TWO slots.
And now from after the 8th entry, before the 10 billion FF FF FF FF FF FF (YY YY YY YY) rows.
And then paste it again, in the NEXT TWO.
Now flash the NTRboot backup.
And yes, I changed my icon before I edited the guide to add the last part.

