Disclaimer.
I will take for granted that anyone who will follow this instructions has a minimum of electronics knowledge and respects how dangerous it can get if taken lightly. I will not be responsable if you go around playing with high voltages and get hurt or break anything. Also, to make these diagnostics and repairs you have to dissasemble your PS2 in order to take the power board out. If you have issues with your power supply and dont know electronics well enough to feel confident about this, you can just buy a replacement PSU for 15$ aproximately online and avoid this completly. IF anyone is wondering why would i bother repairing these old PSUs instead of buying cheap new ones is simply because i like my hardware to be original, and repairing something that would be otherwise be thrown out is very satisfying to me.
I will be referring to the image to make everything easier and more clear.

Symptoms:
Ps2 console wont turn on, no red light and no reaction to ON or RESET buttons in any way when the console is plugged in and the switch on the back is on.
How to confirm if your PSU is having issues:
We will need a Multimeter or Tester.
Your unit's task is to take in the 120v/240v AC from your home's electricty and turn it into @24V DC.
To test if your unit is doing it's job, place your unit on a non conductive surface (wood,plastic), plug in the unit (please be ware; DO NOT TOUCH Point A , is LIVE with 120v/204v), and switch it on. Now with a multimeter check the 1st socket from the left and the 4th socket from the left for DC Voltage on Point B.
If the multimeter shows around 24 volts DC, then the unit is fine and working propperly, if the multimeter shows 0v DC then we have some work to do.
TURN OFF AND UNPLUG BEFORE CONTINUING
Now that we confirmed that the unit is not working, let us see the possible issues.
Possible issues:
1 - Burned out fuse
2 - Blown capacitors
3 - Capacitors lost capacitance
4 - Octocoupler is not workin
5 - Zener Diodes / Diodes broke
6 - Mosfets broke
The Fuse
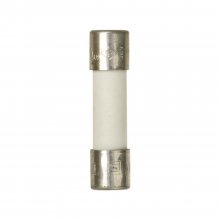
The first thing to test is the F1 Fuse (Point C), simply set the multimeter on "continuity" or "resistance (Ω)" and if the multimeter beeps or shows 0 Ω then the fuse is OK and working.
In case the fuse presents no continuity it would mean it is burned and needs to be replaced. In my case, all units i repaired were PAL units and the fuse was 250V 2.5A but these may differ for other regions, so be sure to check your fuse before you buy a replacement, if you don't find the exact same fuse, buy one slightly lower as close to the original as possible.
Blown Capacitors
Most of the time blown capacitors are quite easy to identify as their phisical appearence change and some even smell bad. If a capacitor is showing a "bulge" on top, it means it most certainly needs replacement. To test them with the multimeter, connect one pin to ground or negative (3rd or 4th socket on point B) and test both "legs" of the capacitor on the under side of the board. One leg should give continuity to ground/negative while the other should NOT give continuity (positve "leg" should not). If one capacitor does give continuity in both legs, means is broken and needs to be replaced.
In case you need to replace one of these capacitors, check what is written on them, the Capacitance, the volts, and the temperature. for istance: 680Uf - 16V - 105º.
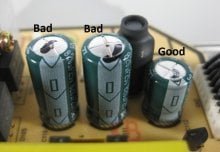
Capacitors lost capacitance
This is the absolutely most common issue i have encountered with these power boards.
Mainly C20 and C3 (point D and E) tend to lose capacitance making it impossible for the board to do its job.
To propperly test the capacitance of a capacitor is kind of quirky afaik, so the next best thing is to simply buy one of each online and change them both. I bought 2 packs of 10 each for about 2 euros, and almost finished them due to how common this issue is, so in any case, sooner or later, you may need to replace them so why not now that you are working on it.
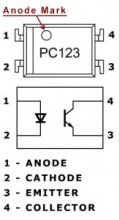
Octocoupler.
This spider looking fella only troubled me once, but is worth checking out nontheless.
In my case the OC was a PC123 equivalent.
You can google how to test an octocoupler. Is quite simple.
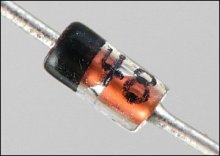
Zener diodes / Diodes.
Set your multimeter to continuity and test the diodes both way. A working diode gives continuity in only "one way". The diodes have a "direction" in which they block or allow current. Test your diode both ways, in one way it should block the current while in the other it should allow it. If the diode gives continuity both ways, or gives no cintuinity at all, is broken. The most common diode to fail is ZD1 and ZD3. You may also want to check the top left corner diodes D10 D9 D7 D8. Testing all the diodes present in the circuit is not a bad idea, just an extra security and is often among the first things you want to rule out.
Broken mosfets.
I never found an issue with these but i've heard of people that did.
In the picture you will notice 2 heatsinks running vertically near the capacitors on the left and near the Zener diodes. If everything else you have tested up until now is working well and you still have issues, these little guys may be the problem.
If you have any doubts please ask, I am not an expert, but will gladly help in what i can.
EDIT: I may take some time to get back here but I do keep an eye on this thread for questions.
I will try to answer some questions encountered here and on my reddit post.
Q1 - Can i swap my broken power supply with the power supply of another ps2?
A1 - Technically you could but you will probably run into some issues. From one revision to another, or model to another, the PSU could change in phisical shape and probably won't fit into the console correctly. The 12V pins socket will be moved and so will be the L-N connector. This will make it practically impossible to re-assemble the unit correctly giving you some frankentseiny-ps2.
Q2 - I Can't repair my psu, i can't find a replacement, what do i do?
A2 - You can buy an external PSU with the correct values and hook it up to the console's input pins. I've done this to test consoles and check if it really was the PSU causing issues and it worked fine. You can check original board for the values you need for the PSU.
Im talking about this kind of external PSU.

Q3 - Information about the MOSFET.
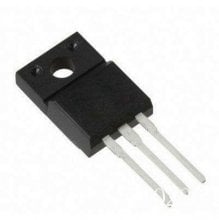
A3 - I honestly can't recall the specs and i can't currently check, if you happen to need this information you can take the mosfet out of the board and see what's written on it, googling this should bring info up.
Example: On one of the sides, there is stuff written, one of these is the name of the brand, the voltage and the model, look for the model name.

I will take for granted that anyone who will follow this instructions has a minimum of electronics knowledge and respects how dangerous it can get if taken lightly. I will not be responsable if you go around playing with high voltages and get hurt or break anything. Also, to make these diagnostics and repairs you have to dissasemble your PS2 in order to take the power board out. If you have issues with your power supply and dont know electronics well enough to feel confident about this, you can just buy a replacement PSU for 15$ aproximately online and avoid this completly. IF anyone is wondering why would i bother repairing these old PSUs instead of buying cheap new ones is simply because i like my hardware to be original, and repairing something that would be otherwise be thrown out is very satisfying to me.
I will be referring to the image to make everything easier and more clear.
Symptoms:
Ps2 console wont turn on, no red light and no reaction to ON or RESET buttons in any way when the console is plugged in and the switch on the back is on.
How to confirm if your PSU is having issues:
We will need a Multimeter or Tester.
Your unit's task is to take in the 120v/240v AC from your home's electricty and turn it into @24V DC.
To test if your unit is doing it's job, place your unit on a non conductive surface (wood,plastic), plug in the unit (please be ware; DO NOT TOUCH Point A , is LIVE with 120v/204v), and switch it on. Now with a multimeter check the 1st socket from the left and the 4th socket from the left for DC Voltage on Point B.
If the multimeter shows around 24 volts DC, then the unit is fine and working propperly, if the multimeter shows 0v DC then we have some work to do.
TURN OFF AND UNPLUG BEFORE CONTINUING
Now that we confirmed that the unit is not working, let us see the possible issues.
Possible issues:
1 - Burned out fuse
2 - Blown capacitors
3 - Capacitors lost capacitance
4 - Octocoupler is not workin
5 - Zener Diodes / Diodes broke
6 - Mosfets broke
The Fuse

The first thing to test is the F1 Fuse (Point C), simply set the multimeter on "continuity" or "resistance (Ω)" and if the multimeter beeps or shows 0 Ω then the fuse is OK and working.
In case the fuse presents no continuity it would mean it is burned and needs to be replaced. In my case, all units i repaired were PAL units and the fuse was 250V 2.5A but these may differ for other regions, so be sure to check your fuse before you buy a replacement, if you don't find the exact same fuse, buy one slightly lower as close to the original as possible.
Blown Capacitors
Most of the time blown capacitors are quite easy to identify as their phisical appearence change and some even smell bad. If a capacitor is showing a "bulge" on top, it means it most certainly needs replacement. To test them with the multimeter, connect one pin to ground or negative (3rd or 4th socket on point B) and test both "legs" of the capacitor on the under side of the board. One leg should give continuity to ground/negative while the other should NOT give continuity (positve "leg" should not). If one capacitor does give continuity in both legs, means is broken and needs to be replaced.
In case you need to replace one of these capacitors, check what is written on them, the Capacitance, the volts, and the temperature. for istance: 680Uf - 16V - 105º.

Capacitors lost capacitance
This is the absolutely most common issue i have encountered with these power boards.
Mainly C20 and C3 (point D and E) tend to lose capacitance making it impossible for the board to do its job.
To propperly test the capacitance of a capacitor is kind of quirky afaik, so the next best thing is to simply buy one of each online and change them both. I bought 2 packs of 10 each for about 2 euros, and almost finished them due to how common this issue is, so in any case, sooner or later, you may need to replace them so why not now that you are working on it.
Octocoupler.
This spider looking fella only troubled me once, but is worth checking out nontheless.
In my case the OC was a PC123 equivalent.
You can google how to test an octocoupler. Is quite simple.

Zener diodes / Diodes.
Set your multimeter to continuity and test the diodes both way. A working diode gives continuity in only "one way". The diodes have a "direction" in which they block or allow current. Test your diode both ways, in one way it should block the current while in the other it should allow it. If the diode gives continuity both ways, or gives no cintuinity at all, is broken. The most common diode to fail is ZD1 and ZD3. You may also want to check the top left corner diodes D10 D9 D7 D8. Testing all the diodes present in the circuit is not a bad idea, just an extra security and is often among the first things you want to rule out.

Broken mosfets.
I never found an issue with these but i've heard of people that did.
In the picture you will notice 2 heatsinks running vertically near the capacitors on the left and near the Zener diodes. If everything else you have tested up until now is working well and you still have issues, these little guys may be the problem.

If you have any doubts please ask, I am not an expert, but will gladly help in what i can.
EDIT: I may take some time to get back here but I do keep an eye on this thread for questions.
I will try to answer some questions encountered here and on my reddit post.
Q1 - Can i swap my broken power supply with the power supply of another ps2?
A1 - Technically you could but you will probably run into some issues. From one revision to another, or model to another, the PSU could change in phisical shape and probably won't fit into the console correctly. The 12V pins socket will be moved and so will be the L-N connector. This will make it practically impossible to re-assemble the unit correctly giving you some frankentseiny-ps2.
Q2 - I Can't repair my psu, i can't find a replacement, what do i do?
A2 - You can buy an external PSU with the correct values and hook it up to the console's input pins. I've done this to test consoles and check if it really was the PSU causing issues and it worked fine. You can check original board for the values you need for the PSU.
Im talking about this kind of external PSU.
Q3 - Information about the MOSFET.
A3 - I honestly can't recall the specs and i can't currently check, if you happen to need this information you can take the mosfet out of the board and see what's written on it, googling this should bring info up.
Example: On one of the sides, there is stuff written, one of these is the name of the brand, the voltage and the model, look for the model name.


