
My First Tutorial
You'll need these:
Blender,
Toolbox,
ExKing-Editor,
RESTBL Calculator,
MSBT Editor,
mc_decompressor,
GameData editor,
and a dump of TotK.
Note: xxx refers to your weapon's name
Step 1: Create folder
Create a folder like this:
YourModName
-----romfs
----------GameData
----------Mals
----------Model
----------Pack
---------------Actor
----------RSDB
----------TexToGo
----------UI
---------------Tex
--------------------Icon
Step 2: Edit .pack.zs
Copy an actor that matches your weapon's type (swords, lswords or spears) from the Pack/Actor folder in the TotK folder into your Actor folder and rename the pack file into your new weapon's name. E.g. Weapon_Lsword_018.pack.zs
Open the actor in your Ex-King Editor.
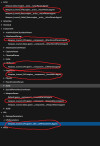
Rename these files:
Actor/xxx.engine__actor__ActorParam.bgyml
Component/AttachmentParam/xxx.engine__actor__AttachmentParam.bgyml
Component/LifeParam/xxx.engine__actor__LifeParam.bgyml (1)
Component/ModelInfo/xxx.engine__actor__ModelInfo.bgyml (2)
Component/WeaponParam/xxx.engine__actor__WeaponParam.bgyml (3)
Life/LifeParameters/xxx.engine__actor__LifeParameters.bgyml (4)
In 1:
Change the Weapon_... after LifeParameters: into your weapon name.
In 2:
Change the FmdbName and ModelProjectName into your weapon name.
In 3:
You can edit:
Base Attack for attack power,
SheathName for its sheath,
SubType for its effect.
In 4:
You can edit the MaxLife to edit its duaribility.
Next, open the Actor/xxx.engine__actor__ActorParam.bgyml and change:
ActorNameRef,
AttachmentRef,
LifeRef,
ModelInfoRef,
WeaponRef into your weapon name.
Finally, don't forget to press ctrl-s to save.
Step 3: RSDB
Copy ActorInfo.Product.yourversion.rstbl.byml.zs(1), GameActorInfo.Product.yourversion.rstbl.byml(2), PouchActorInfo.Product.yourversion.rstbl.byml(3) into your RSDB folder.
In 1:
Copy the text from ActorName to __RowId for a vanilla weapon that matches your weapon's type and rename the ActorName,FmdbName,ModelProjectName and __RowId into your actor name.
In 2:
Copy a line for a vanilla weapon that matches your weapon's type. Change the Life into your weapon's durability.
In 3:
Copy the text from BundleActorNum to __RowId for a vanilla weapon that matches your weapon's type. Change the __RowId. Also change the subtype and sheath if you edited them.
Step 4: Mals
Copy the USen.Product.yourversion.sarc.zs into your Mals folder.
Open it, extract the PouchContent.msbt and use Msbt Editor to edit it.
Replace the PouchContent.msbt file in the USen file with your new file.
Step 5: UI
Copy a weapon icon in the UI/Tex/Icon into your Icon folder. Rename it, open it in Toolbox and rename all of the files. Replace the picture with your new Icon.
Step 6: Tex
Copy some weapon tex files in the game dump into your TexToGo folder, rename them, open them in toolbox and replace the images in them into your image textures.
Step 7: Model
Decompress the mc model files first.
Copy one weapon bfres file into your model folder, rename it and open it in toolbox.
Rename all of Weapon_xxxxxxxx into your weapon name. (Exept for materials and objects, these are optional)
Export the dae file.
Then open up Blender and go to File->Import->Dae and import your dae file.
Replace the original model with your new weapon model. (Delete the original one and import your new one, you have to look out for the handle though)
Select your new model THEN the bones and ctrl p->with empty groups.
Export it into fbx (File->Export->Fbx) and change these:
Path Mode->auto
Custom properties->check
Apply Scalings->Fbx Units Scale
Armature/Add leaf bones->uncheck
Enter toolbox and replace the model with your new one. (Uncheck use materials)
Right click the TexToGo folder and select import and import your textogo files you've edited earlier.
Enter materials and replace the textures with your new one. (Double click on one, add your image texture and select your new texture, quit the menu)
Enter objects and change the objects' material so that they match your new material.
Save.
Step 8: GameDataList
Copy the GameDataList.Product.yourversion.byml.zs from the GameData folder in your dump.
Open up GD editor, select addMaterialsFlag and enter your new weapon's name.
Select your gamedata file, and press generate.
FINAL STEP:
Open up RSTB generator, change the version into your game's version, select your mod's folder (NOT ROMFS, in calculate rstb for single mod) and press calculate.
Your mod is now done!
Troubleshooting:
If the weapon isn't showing up when you equip it, check your pack and rsdb files.

